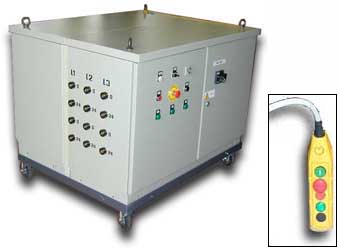
Control Panel
Electric board size: 1200x1000 mm, 800 mm height, installed on a wheeled frame.
380 V three-phase power supply, 24V - 48V alternate power, maximum power range: 30 KVA
 The cabinet accommodates the following components: The cabinet accommodates the following components:
* 1 door locking master switch
* 1 isolation transformer, power: 30 KVA, firm power: 380V, 50Hz, three-phase, interruptible power: two separate windings for 24 V 200 A (5000 W) phase
* 3 contactors
* 3 disconnecting switches
* 12 output terminals
Serial or parallel coupling of phase windings allow the following supply selections:
* 6 24 V insulated elements, maximum rated power: 5 KW
* 3 24 V grounded elements, maximum rated power: 10 KW
* 3 48 V insulated elements, maximum rated power: 10 KW
A set of controls and commands has been provided for, and more particularly:
* 1 timer for heating-up time pre-setting
* 1 automatic - manual switch
* 1 OFF switch
* 1 ON switch
* 1 phase ON led
* 1 emergency stop push-button
* 1 remote control socket
* 1 undervoltage led
* Cable
Connection Process
Once the line connection has been established and the conduction of electricity across the surface ascertained, resistors can be connected as follows:
* Less than 5 KW resistor: use a cable set for each heating element, connected between 0 - 24 V to a single core, for a maximum of 6 resistors. Whenever connecting more than one resistors, cores should be used in a balanced manner.
* 24 V resistor, from 5 KW higher to a maximum of 10 KW: Use two cable sets for each heating element. Connect one set to the two 0 terminals of a single core, and the other to the two 24 V terminals of that same core, up to a maximum of three resistors. Use an appropriate clamp to connect two cable sets to one resistor.
* 48 V resistor, maximum rated power: 100 KW: use a cable set, connect one cable to the upper 0 V terminal, and one cable to the lower 24 V terminal; slide a bridge in between the two central 0V - 24V terminals mounted on the same core; three resistors at most.
Heating Process
Drive the resistors into the tie rod to be heated. Select the required function and power supply the cabinet.
* Manual function: as soon as the "start" push-button is turned ON, resistors start heating until an interruption occurs by pressing the "stop" or "emergency" push-buttons.
* Automatic function: as soon as the "start" push-button is turned ON, resistors start heating for a pre-established period of time, before being automatically switched OFF. Interruption occurs anytime by pressing the "stop" or "emergency" push-buttons.
* Timer adjustment: make sure the timer is set to "E". Pre-set the timescale with a screwdriver, before turning the handle to the heating time required. Turn the selector ON and press the "start" push-button.
* Remote control: same operations apply, but for the cabinet "start" push-button being disabled. |